StudioTwin Plugin Installation
This guide walks you through installing the StudioTwin plugin into Unreal Engine, connecting it to your account, and confirming it works.
Before you start
You will need:
- A StudioTwin account and an API key. Sign up at app.studiotwin.ai, then create a key on the API Keys page. See Get Started if you don't have an account yet.
- Unreal Engine 5.6, 5.7 or 5.8. Each build is compiled against one specific engine version.
Installation
Four steps, in order. Once you have finished step 4 you are set up and can start generating.
1. Install the plugin
Pick the method that suits you. Your choice is remembered across this page.
- FAB / Epic Launcher
- Manual → project
- Manual → engine
StudioTwin is listed on FAB and can be installed through the Epic Games Launcher, which handles the download and puts the files in the right place.

- Open the listing and add StudioTwin to your library.
- In the Epic Games Launcher, go to your Fab Library (Fab → My Library).
- Select StudioTwin, then click Install plugin.
- In the Install Plugin dialog, pick your engine version under Slot to add plugin to, then click Install.
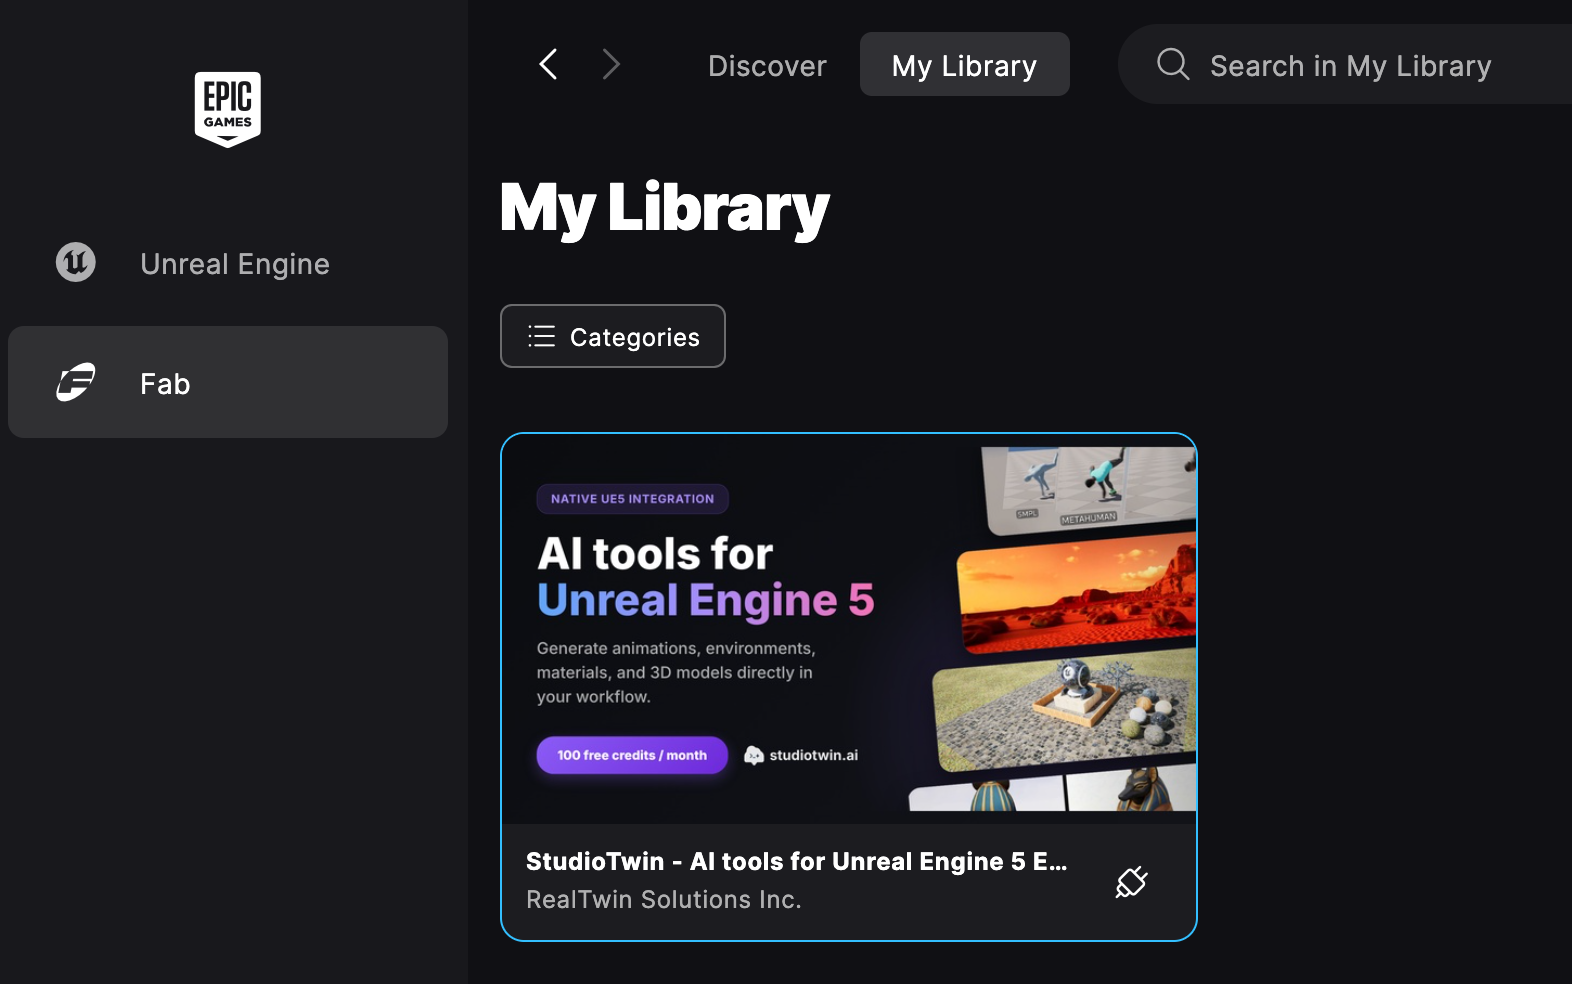
The Launcher installs the plugin into that engine version, so it is available to every project using that engine.
Ensure that you verify either your Unreal Engine version or your specific Unreal Engine project version, and install the corresponding plugin version. Past releases and their supported engine versions are listed in the Changelog.
Installing into a single project keeps the plugin alongside the work that uses it, which suits teams sharing a project through source control and anyone running several engine versions side by side.
Download the build matching your engine version
- StudioTwin v2.6.2 - Unreal Engine 5.6.zip
- StudioTwin v2.6.2 - Unreal Engine 5.7.zip
- StudioTwin v2.6.2 - Unreal Engine 5.8.zip
Copy it into your project
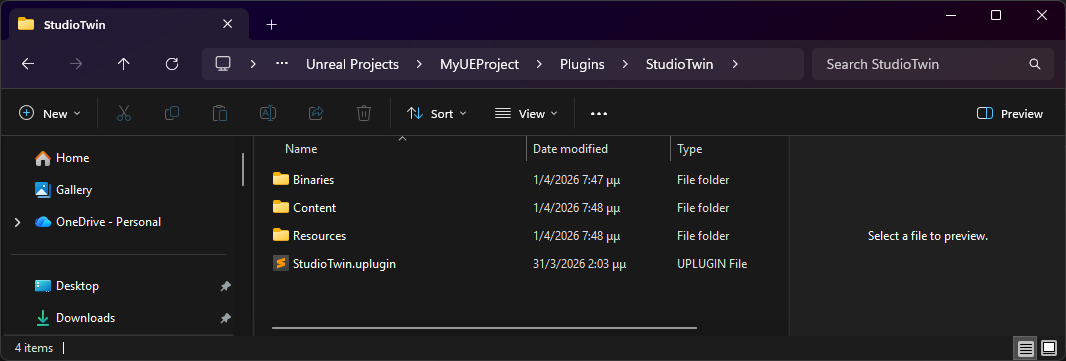
Navigate to your project's root directory. If a Plugins folder isn't there, create one. Extract the archive and copy the StudioTwin folder into Plugins, so the path is:
[Project Root Directory]/Plugins/StudioTwin/
Check the folder layout
The plugin descriptor must sit one level below Plugins:
Plugins/
└── StudioTwin/
    ├── Binaries/
    ├── Content/
    ├── Resources/
    └── StudioTwin.uplugin      ← must be here
A common mistake is ending up with Plugins/StudioTwin/StudioTwin/StudioTwin.uplugin because the archive was extracted into a folder of the same name. Unreal never scans beneath a plugin it has already found, so a double-nested folder is silently ignored and the plugin never appears.
Ensure that you verify either your Unreal Engine version or your specific Unreal Engine project version, and download the corresponding plugin version. Past releases and their supported engine versions are listed in the Changelog.
Installing into the engine makes StudioTwin available to every project that uses that engine version.
Download the build matching your engine version
- StudioTwin v2.6.2 - Unreal Engine 5.6.zip
- StudioTwin v2.6.2 - Unreal Engine 5.7.zip
- StudioTwin v2.6.2 - Unreal Engine 5.8.zip
Copy it into the engine
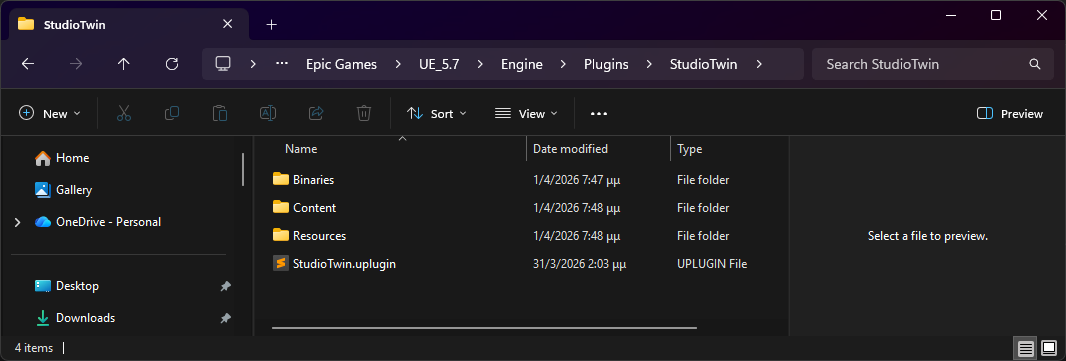
Browse to the root folder of the Unreal Engine version you want to use, extract the archive, and copy the StudioTwin folder into Engine/Plugins, so the path is:
[Unreal Engine Root Directory]/Engine/Plugins/StudioTwin/
Check the folder layout
The plugin descriptor must sit one level below Plugins:
Engine/Plugins/
└── StudioTwin/
    ├── Binaries/
    ├── Content/
    ├── Resources/
    └── StudioTwin.uplugin      ← must be here
A common mistake is ending up with Plugins/StudioTwin/StudioTwin/StudioTwin.uplugin because the archive was extracted into a folder of the same name. Unreal never scans beneath a plugin it has already found, so a double-nested folder is silently ignored and the plugin never appears.
Ensure that you verify either your Unreal Engine version or your specific Unreal Engine project version, and download the corresponding plugin version. Past releases and their supported engine versions are listed in the Changelog.
2. Check the plugin is enabled
Whichever method you used, confirm the plugin is enabled before going further.
- Open your project and go to Edit → Plugins.
- Search for StudioTwin.
- If the checkbox isn't ticked, tick it and click Restart Now.
The toolkits only appear once the editor has restarted.
Installing into a project usually enables the plugin for you. Installing through FAB or into the engine does not, so this check matters most for those two methods.
3. Configure API Key
The API key authorises the plugin to talk to the StudioTwin cloud service.
You can create and manage keys in the StudioTwin Dashboard. See API Keys for details.
- In Unreal Engine, go to Edit → Project Settings.
- Under Plugins, select StudioTwin.
- Paste your key into the Api Key field. Keys begin with
st_. - Leave Api Endpoint Url empty. It defaults to the correct endpoint.
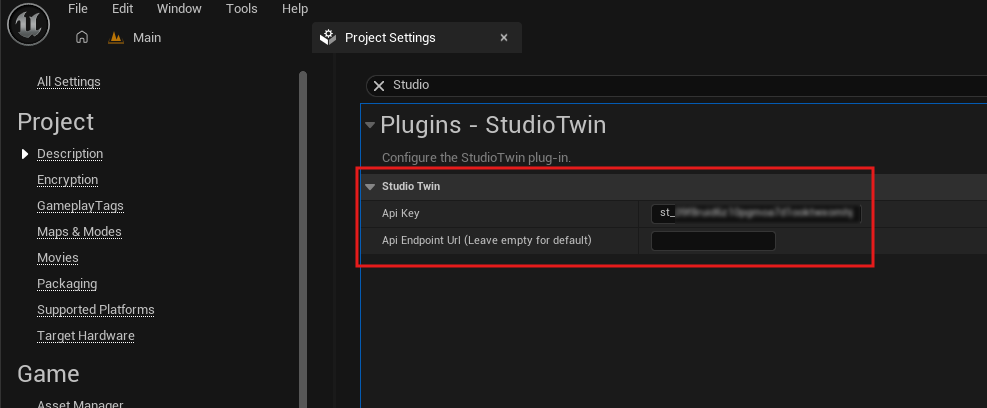
The key is validated in Project Settings, so a mistyped or inactive key is flagged here rather than failing later during a generation.
Paste carefully. A trailing space picked up while copying is an easy way to end up with an invalid key.
4. Verify the installation
Open the Tools menu. You should see a STUDIOTWIN section listing every toolkit:
- Audio Toolkit
- Environment Toolkit
- Material Toolkit
- Mesh Toolkit
- Motion Toolkit
- Help
Hovering a toolkit opens its submenu of tools. If you see this menu and your API key is accepted, the installation is complete.
For a quick end-to-end test, open Tools → Motion Toolkit → Text to Motion and generate from a short prompt such as A person is walking forward hastily. It costs 5 credits and needs nothing in your project, since the plugin ships its own skeletal mesh, so it confirms the full round-trip to the cloud service. See How Credits Work for what each tool costs.
That's it. Now explore the Toolkits.
Maintenance and troubleshooting
You don't need any of this to get started. Come back when you are upgrading, removing the plugin, or something isn't working.
Upgrading
From v2.5.0 onward the plugin checks for new versions and notifies you when one is available. How you upgrade depends on how you installed it.
Always upgrade using the same method you installed with. Installing manually and then upgrading through FAB, or the reverse, leaves two copies of the plugin in different locations and will break your setup. If you want to switch methods, uninstall the existing copy first.
- FAB / Epic Launcher
- Manual → project
- Manual → engine
Upgrade through the Epic Games Launcher, the same way you installed. The Launcher replaces the previous build for that engine version, so there is no need to delete anything by hand.
Close the Unreal Editor before upgrading, and reopen your project afterwards.
- Close the Unreal Editor completely.
- Delete the entire existing
StudioTwinfolder from your project'sPluginsdirectory. - Copy in the new
StudioTwinfolder. - Reopen your project.
Copying a new build over an old one leaves stale files behind and is a frequent cause of load failures. Always delete the old folder first.
- Close the Unreal Editor completely.
- Delete the entire existing
StudioTwinfolder fromEngine/Plugins. - Copy in the new
StudioTwinfolder. - Reopen your project.
Copying a new build over an old one leaves stale files behind and is a frequent cause of load failures. Always delete the old folder first.
Uninstalling
- Close the Unreal Editor.
- Remove the plugin, through the Epic Games Launcher if you installed from FAB, or by deleting the
StudioTwinfolder if you installed manually. - Reopen your project.
Generated results that are standard Unreal assets, such as the Texture2D and TextureCube environment maps, Static Meshes, Materials, animations and sound waves in your Content folder, are unaffected and keep working.
The Environment Toolkit's Environment Map to World tool also creates a StudioTwin-specific data asset to assemble the scene. Assets of that type depend on the plugin and will stop loading once it is removed.
Troubleshooting
The plugin doesn't appear in Edit → Plugins
Usually a folder layout problem. Check that StudioTwin.uplugin sits exactly one level below Plugins, and that you installed into the engine version you actually launched.
Error: "The following modules are missing or built with a different engine version"
The build you installed was compiled for a different Unreal Engine version than the one you are running. Download the build that matches your engine and reinstall. Past releases and the engine versions they support are listed in the Changelog.
If you are running an engine built from source, it may not be binary-compatible with a build made for the corresponding official release.
The toolkits are missing from the Tools menu
First, scroll right to the bottom of the Tools menu. The STUDIOTWIN section sits below Unreal's own entries and is easy to miss on a short screen.
If it still isn't there, the plugin may be installed but not enabled. Go to Edit → Plugins and search for StudioTwin. If its checkbox isn't ticked, tick it and click Restart Now. The toolkits only appear once the editor has restarted.
The API key is invalid
- Check for a leading or trailing space introduced when copying.
- Confirm the key is Active and not suspended on the API Keys page.
- Confirm the key belongs to the organization you expect.
- Confirm Api Endpoint Url is empty.
Still stuck? See Support, and include your plugin version, Unreal Engine version, and anything in the Output Log that mentions StudioTwin.